A leaking roof is every homeowner’s nightmare, especially in Connecticut, where heavy rain, snow, and ice dams can put even the sturdiest roofs to the test. A single leak can lead to ceiling water stains, mold growth, insulation damage, and costly structural problems if left unchecked. Performing timely roof repair from the inside can prevent further damage, protect your home, and save money. This guide will walk you through how to detect, temporarily stop, and permanently fix a leaking roof from the inside, while also covering preventive measures and Connecticut-specific tips.
Signs Your Roof is Leaking Inside
Detecting a roof leak early is crucial for minimizing damage. Look for these warning signs inside your home:
1. Ceiling Water Stains
Water stains on your ceiling are often the first sign of a leak. These stains can appear as yellow or brown discoloration, usually near roof penetrations or along walls.
2. Dark Spots or Bubbling Paint
Peeling paint or dark spots on walls and ceilings indicates trapped moisture. Ignoring these signs can lead to mold growth and further structural damage.
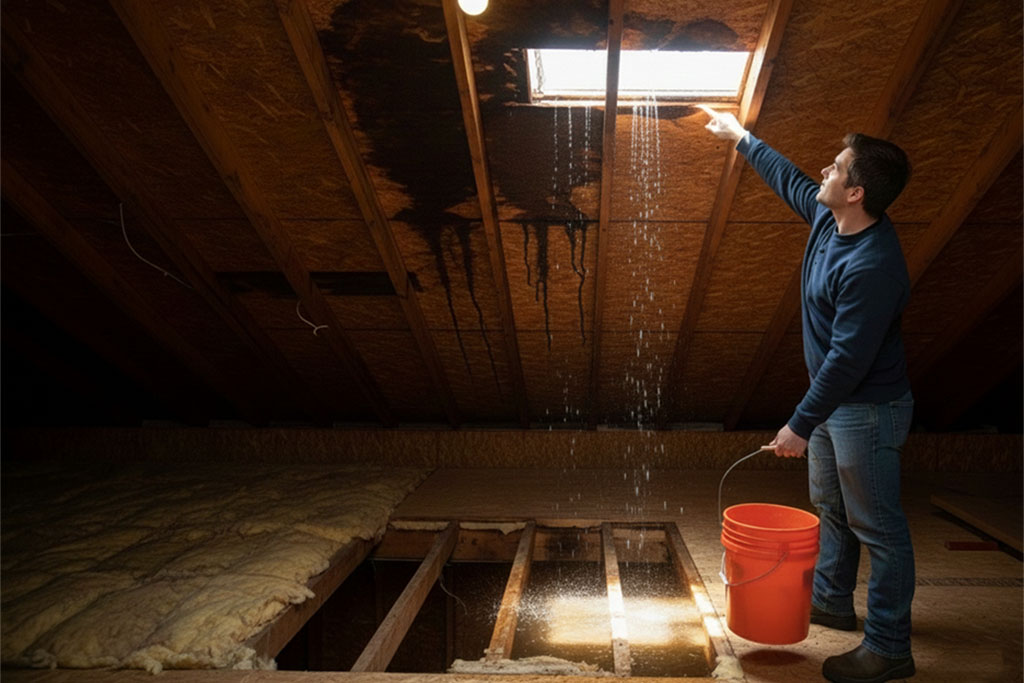
3. Dripping Water in the Attic
During heavy rain, inspect your attic. Drips or puddles mean water is entering your home. Keep a bucket or container ready to prevent further damage until repairs are made.
4. Musty Odors
Persistent musty smells inside your home often point to hidden leaks. Moisture in insulation or attic materials creates the perfect environment for mold and mildew.
5. Sagging Drywall or Plaster
Bulging or sagging ceilings indicate that water has saturated drywall or plaster. Immediate attention is needed to prevent collapse.
Safety First – Protect Yourself During Roof Repairs
Working in an attic or near a leaking roof comes with safety risks. Follow these tips:
- Wear protective gear: Gloves, goggles, and a helmet are essential.
- Secure ladders: Ensure ladders are on stable ground and properly angled.
- Turn off electricity: Water leaks can make electrical wiring dangerous.
- Handle insulation carefully: Wet insulation can irritate skin and lungs.
- Watch for mold: If mold is present, wear a respirator to avoid inhaling spores.
Safety precautions prevent injury and ensure a smooth repair process.
Step-by-Step Guide to Fixing a Leaking Roof from the Inside
Step 1 – Locate the Source of the Leak
Finding the leak’s exact location is the most critical step. Water can travel along rafters, making the source appear far from the visible stain.
- Inspect attic spaces carefully.
- Trace water stains to the highest point on the ceiling.
- Check areas around vents, chimneys, skylights, and roof penetrations.
- Use a moisture meter to find hidden wet spots in wood or insulation.
Step 2 – Temporary Measures to Stop Water Damage
Before permanent repair, limit water damage:
- Place buckets or containers under drips.
- Use towels or rags to soak up water.
- Cover leaks temporarily with plastic sheeting or tarp.
- Apply roof patch tape or silicone sealant inside the attic if safe to do so.
Note: These are short-term solutions and should be followed up with permanent roof repair.
Step 3 – Remove Damaged Materials
Once water is under control:
- Remove wet insulation carefully using gloves.
- Cut out damaged drywall or plaster with a utility knife.
- Allow the attic to dry completely before attempting permanent repairs.
- Inspect roof decking for soft or rotted wood that needs replacement.
Step 4 – Permanent Roof Repair Options
Depending on the damage, consider these solutions:
Repair or Replace Roof Flashing
Flashing around chimneys, vents, and skylights is a common leak source. Replace or reseal flashing with roofing cement or metal flashing to prevent further leaks.
Shingle Repair or Replacement
For missing or damaged shingles:
- Lift surrounding shingles carefully.
- Slide a new shingle under the old ones and secure with nails.
- Seal edges with roofing cement to prevent water entry.
Roof Underlayment Repair
If water has penetrated underlayment:
- Cut out damaged sections.
- Lay new underlayment material.
- Secure with nails and seal edges with roofing adhesive.
Add Drip Edges or Ice Dam Barriers
Prevent future leaks by installing drip edges and ice dam barriers along roof edges. This is especially important in Connecticut winters, where ice dams are common.
When to Call a Professional Roof Repair Service
Some leaks are too extensive for DIY repair:
- Multiple or large leaks
- Structural damage to rafters or decking
- Severe ice dams or snow load issues
- Persistent water stains despite temporary fixes
Calling a professional ensures safe, long-lasting solutions. Connecticut homeowners often face winter roof damage, so early professional inspection is recommended.
Tools & Materials Needed for Inside Roof Repair
- Ladder, gloves, goggles, helmet
- Buckets, towels, plastic sheeting
- Roof patch tape or silicone sealant
- Replacement shingles and flashing
- Moisture meter
- Utility knife and drywall tools
- Safety checklist
Having the right tools ensures repairs are efficient and effective.
Cost Considerations for Roof Repair in Connecticut
Repair costs vary depending on damage severity:
- Temporary fixes: $20–$100
- Minor professional repairs: $150–$500
- Major roof repair or flashing replacement: $500–$2,000+
Seasonal weather in Connecticut, like snow, ice, and rain, can increase repair urgency and costs. Homeowners should budget for emergency roof repair during winter months.
Preventive Measures to Avoid Future Roof Leaks
Preventing leaks is easier than fixing them. Consider these tips:
- Inspect roofs after storms, ice, or heavy snow.
- Keep gutters and downspouts clean.
- Maintain proper attic insulation and ventilation.
- Seal roof penetrations and flashing before winter.
- Use ice dam prevention strategies, like heat cables or insulation boards.
FAQs About Roof Repair from the Inside
1. How quickly should I repair a roof leak inside my house?
Immediate action is critical. Delaying repair can lead to mold, structural damage, and higher costs.
2. Can I fix a leaking roof myself?
Small leaks can be temporarily patched, but permanent repairs, flashing replacement, or extensive damage require professional help.
3. How do I know if my roof flashing is damaged?
Signs include water stains near vents, missing flashing pieces, or rust/corrosion around metal edges.
4. What materials are best for temporary vs permanent roof repair?
Temporary: tarps, plastic sheeting, silicone sealant.
Permanent: shingles, metal flashing, roofing cement, underlayment repair.
5. Does insurance cover inside roof damage in Connecticut?
Many homeowners insurance policies cover sudden roof damage from storms, but gradual leaks may not be covered. Always check your policy.
Final Takeaway
Fixing a leaking roof from the inside requires careful detection, temporary mitigation, and permanent repair. Connecticut homeowners face unique challenges, including snow, ice dams, and heavy rain, making early roof repair critical. By following this step-by-step guide, inspecting regularly, and taking preventive measures, you can protect your home, reduce costs, and avoid structural damage. Remember, safety first, and don’t hesitate to call a professional for serious or persistent leaks.
